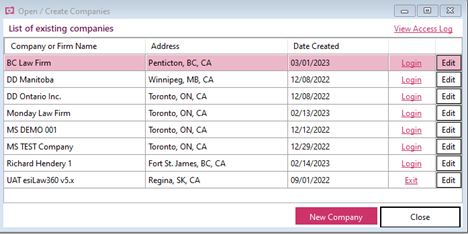
This article will outline the steps to switch companies in Unity® Accounting. This information is helpful to know when you have more than one company file in your Unity® Accounting account. For example, you may have a primary company and a separate test company for training purposes.
Main topics we will cover in this article:
- Checking your list of companies in Unity® Accounting
- Logging into the desired company
- Verifying you are logged into the correct company
Important:
These instructions are for those already a Unity® Accounting customer with multiple active companies.
Checking your list of companies in Unity® Accounting
Steps
1. In an active company, select File > Open/Create Company
2. Select Login for the company that you would like to access. You can click Login on the right side of the company you want to access.

3. The confirmation prompt will appear. Click Yes.

4. You will then be prompted for the username and password for the selected company.
Logging into the desired company
Steps
1. From the login screen, verify that you are logging into the correct company by checking the name under Select Company

2. Once you have entered your username and password for the company and clicked on Login, you will get confirmation of a successful login attempt. Select OK.

3. You have now successfully logged into another company file within Unity® Accounting.
Verifying you are logged into the correct company
Steps
1. When you are logged into Unity® Accounting, look at the top toolbar to see the company name you are logged into. Verify it looks correct. In the screenshot below, we are logged in as Law Firm Test Company 1

Now you know how to confidently switch between company files within Unity® Accounting and verify which company you are logged into.

